by Mike McCabe
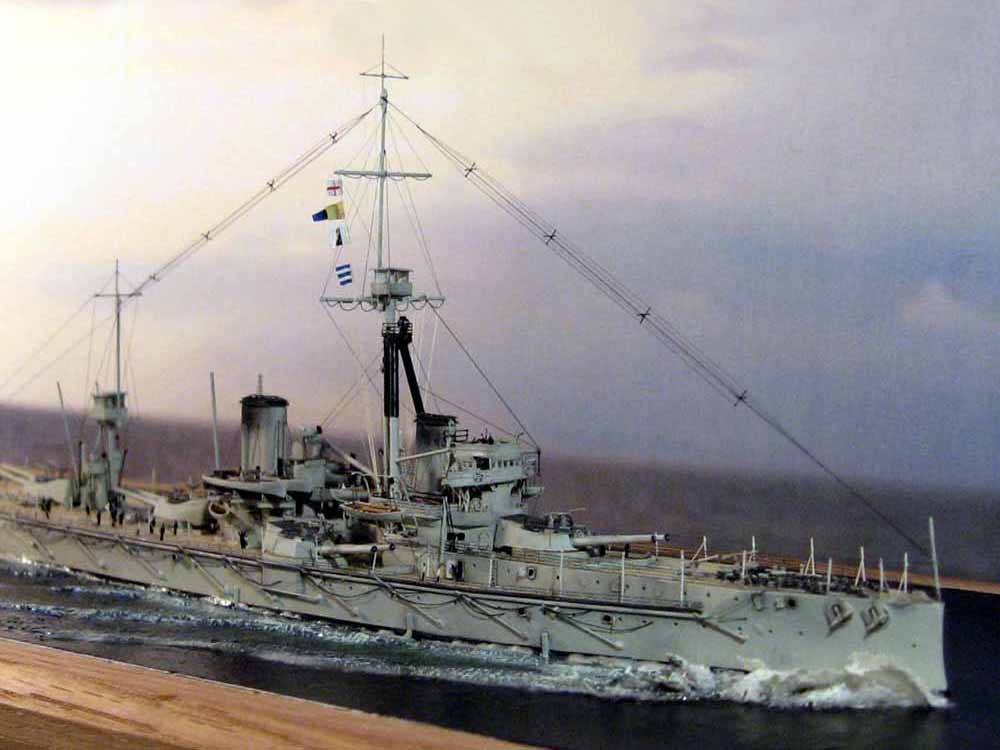
1/700 HMS Dreadnought 1909 (Combrig)
HMS Dreadnought is a ship which surely needs no introduction or history lesson, suffice to say she was a ship that changed the course of naval design and history, and played a part in the chain of events which lead to the First World War.
The Combrig kit contains most of what is required to build an excellent replica out of the box, no railings are included but there is an etched fret in rather soft metal which provides for many of the fine details. References for Dreadnought are very good, my main source for the project was the Anatomy of the Ship volume, on checking the kit against the plans and photographs in this and other references, I could find very little required in terms of additions to the kit.
This does not mean however that construction is simple, this is a very complicated kit requiring a high degree of forward planning to make sure that construction and painting is carried out in an appropriate manner. In particular the superstructure is a difficult assembly which is complicated by the use of etched parts, which whilst giving a fine finished appearance, are made from too soft a metal to act as support and constructional components. Fit is mainly good, though I had problems with the bridge assembly as the etched deck house does not fit the bridge deck, I built a new bridge deck and compass platform from brass sheet to add some strength and solidity to a very delicate structure. As this is supported by etched cruciform supports from the same soft metal, I was sure this would lead to problems in the future, so I used some fine steel tubing which is hidden at the rear of the bridge to support the final structure.
Masts were replaced by brass rod, which proved to be essential given the heavy rig of the ship, more of this later. Other than the kit parts I used the White Ensign HMS Tiger and Askold frets to provide some small details, fine brass rod to make the torpedo net booms and derricks, fine chain for the anchor chain from Hobby World in Japan, this comes already blackened so is very useful. All the photos of Dreadnought seem to show her with a number of open hatches along the hull so I used the wem USN doors fret for some of these and some open doors in the superstructure, one open door or hatch looks much like another to my mind. Stanchions are from pre-coloured (ivory) wire from www.little-cars.com, a very useful source for bits and pieces, as is the black wire used for rigging the net booms supports and yardarm footropes. The torpedo net itself is another of their products, a spiral steel wire which required only some dry brushing with a medium grey to give what I think is a very pleasing and scale effect. Figures are Eduard, repainted in a less garish colour sheme.
Painting is again something that needs to be planned carefully, the scheme is overall light grey using Humbrol 129, decks are wem corticence for the linoleum covered areas, the wooden deck is humbrol 148 as a base with lightened and darkened shades of the same used to streak the deck and give a wood effect. I kept weathering to a minimum using only a wash and some drybrushing to bring out highlights and some dark grey pastel on the funnel tops.
As somebody who has not built a lot of pre-Dreadnought or other ships that require a lot of rigging, this was something of a challenge. Most of the rig is concentrated in and around the foremast which does not leave a great deal of space. Starting from the inside outwards, I rigged the signal yards with sand coloured stretched sprue to lighten the appearance, all other rigging is with black sprue. Photos again often showed the seaboats out over the hull sides, an effect I liked and hopefully managed to get, on tightening the sprue pulled the boats nicely into line which I think was more good luck than planning! Once I had completed most of the rig there was only really the issue of the cage aerials. As most of the rigging up top on Dreadnought consisted at the time of these cage aerials, I felt using only a couple of lines of sprue would not really give the light look and would leave the model looking a little bare. With any structure of this kind the challenge is to get something that looks light enough, yet is sufficiently strong to take being tightened and will survive the handling needed to actually put it on the model. I reasoned that sprue on its own would be too delicate, yet the method I used once before of rolling fine railing was still too heavy. To cut a long story short, after about eight attempts, each getting gradually closer, I hit on the final method which I used.
I made a jig on a foot long piece of timber with two cup hooks about eight inches apart to give plenty of room over for a length of line for attachment. The length of aerial needed needs then to be measured on the model and a decision made on how the aerial will look. At this stage the look is more important than accuracy, the aerials the ship carried had six aerials supported from a central line with stars in about eight different places. To do this would look too heavy, as well as being a strain on the sanity. Instead I decided to use four aerials with four crosses as the effect would still be about right and the finished result would give a suitably fine appearance. Apologies at this point for not taking build up photos of this, I meant to but was concentrating too much when building the second and forgot. Using fine 0.003 fishing line blackened with a marker, I tied this to each hook and pulled it taut, then marked off the length needed and evenly spaced the crosses to support the aerials and the piece of timber. Then using the same black coloured wire as used for rigging previously, I cut eight equal lengths to make the small crosses and glued these in place with a small drop of ca, by looking directly down onto the marks made on the timber the correct placement of these can be made. The vertical part of the cross was made first then the horizontal, once these had been left a few minutes to dry, I painted them over with an acrylic matt varnish to strengthen the bond (thanks Rob for that tip). Once the crosses were in place, I attached lines of finely stretched sprue to the ends of each of the crosses in turn, I usually use poly cement for attaching sprue and did this at first but the rigging collapsed. Continue until all the lines are attached, remembering to leave plenty of length over at each end. To gather the lines together to form the aerial, I used a pair of small, sharp scissors to cut the lines to the required length and then attached them with a small bit of ca again. If there is a little left over then you can use poly cement on the end of a piece of wire to melt away the excess. Do this at both ends and you have your aerial. I then cut it off the jig, still leaving plenty of excess at each end of the central line to give enough room for attachment.
The plan was to attach these using ca glue and tighten, which all went surprisingly well after attaching the aerial between bow jackstay and foremast, until I looked from the side and realised that the strain of tightening had pulled the foremast out of alignment. After a slightly panicked email, thanks go to Jim Baumann for coming up with the solution which was to attach the aerial between fore and mainmasts, then the rigging between mainmast and stern jackstay and gradually tighten each so as to pull both the foremast back into alignment with a similar tension on both sides, and retain the mainmast alignment through holding it with the rigging at the stern. Amazingly this worked and I breathed a huge sigh of relief and raided the fridge for beer.
Sometimes the finishing touches are what make a model, in this case it took some time to come up with a method to build the cage aerials but I think the finished effect is well worth it.
Having spent that time on the model, it was getting on for three months now, though I had been building another model alongside it and it was summer (or what has passed for it in the UK this year), I wanted to finish it off with a good seabase showing the ship moving powerfully at moderate speed. Using the same method of watercolour paper and acrylic gel that I always use, I formed the bow wave from a base of clear plastic moulded and glued into place and hardened with ca glue, then I used tissue paper soaked in ca (another JB method) then put into place around the wave. Once this had dried I used a pair of needle point tweezers to pull away the edge of the tissue paper to break up the outline and create the wave effect, finishing it off with acrylic paint similar to the rest of the water.
Overall this was a long, complicated and at times difficult build that requires a lot of forward planning to get the best results out of what is a really excellent kit. I would highly recommend the Combrig kit but do be aware of the limitations of the brass provided, it looks very good in the box but is difficult to use and does not provide enough structural support. Other than that this was a very enjoyable and rewarding build and I am very pleased with how it turned out.
