by Patrizio Carlucci
1/700 Italian Battleship Roma (Regia Marina)
| As some of you may have been aware, the last 9th of September marked
the 60th anniversary
of the battleship "Roma" sinking.
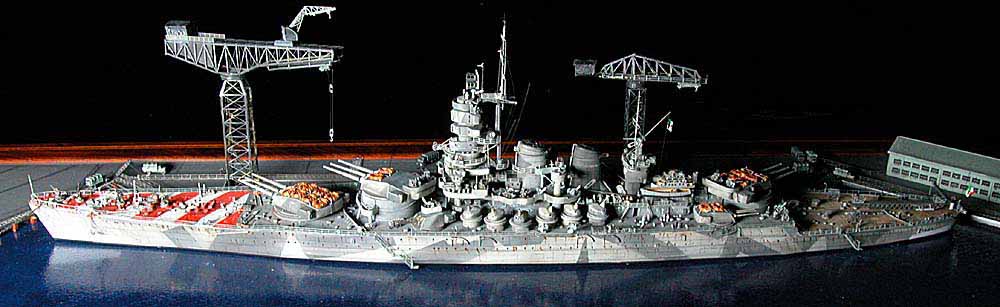
A few days after that event, I found out that Giampiero Galeotti is the same student that spent years in my classroom during our grades at school in Rome, just teenagers, rediscovering a friend that in his and mine early thirties still share my same passion. Two events that decided my next subject and, for a Roman and supposedly ship modeler, a mandatory step. The situation I wanted to depict was the summer of 1943 during the installation of the "Gufo" radar system. I tried to photograph the diorama to simulate a night scene lit by the harbour's projectors using a particular illumination arrangement and my trusty Nikon D100. |
| The model
The "Regia Marina" kit is a real beauty and this article couldn't review
it better I always forget to take pictures during build-up so there are
no images of in-between steps to show improvements and scratcthbuilt details.
Giampiero gave me a copy of the original drawings that I added to the extensive
reference material I had already. The kit seems very accurate as everything
coming from Regia Marina I had a chance to ran into. The instructions provided
are fairly clear and, for any Italian speaking reader, a complete technical
guideline of the original ship, with detailed explanation of every component
or PE part. Without the original drawings though, I believe it is very
hard to understand the precise position of the main castle's complex stairs
and railings layout and in particular of the many fittings that are omitted
for practical reasons. At the end I still consider an high quality resin
kit like this, supposed to almost fall toghether without troubles, still
an intense work of adaptation, sanding and guessing.
The parts I entirely rebuilt are the platforms around the main mast (masts of course included) with all their support structures. Apart from this and other numerous small improvements, I removed all the moulded on cable reels, funnel grilles and boats' chocks to use PE in their place. The compartments in the funnels, were rebuilt as well using a thin resin wafer over-pour cut in shapes. Other areas of major rework are the teak covered surface, almost completely re-scribed, and the secondary AA armament. The 4 37/54 on the bow have been scratch-built around the flat provided PE and the 4 120/40 amid ship are completely rebuilt. Every support rod or beam supplied with the kit has been substituted with heat-stretched sections Of Evergreen Rods in different thicknesses. The same process worked for the barrels of the 12 80/50 stabilized AA. The boat chocks on the decks that were not represented at all are actually support braces for cable reels (PE) or trimmed parts of different details from other sets. I have used brass from the included fret apart from stairs, ladders and railings. All of this too thick compared to GMM standards. Cable reels, figures, anchors, stairs, ladders and some watertight doors are all from GMM. My greatest regret at the end was not to have ordered a set of GMM Gold Plus ultra fine railings. I couldn't wait to finish the model and as usual I never plan too much in advance for a project. |
| Painting:
The model went thru so many painting steps I am having an hard time to remember. After regular masking and airbrushing for the basic scheme, I have tried to blend the camo areas with very more delicate airbrush passes using different shades of the base color and several washes. Most of the colors used are from Humbrol. For the outlines of the metal plating I have followed two different steps. A 0.05 mm liner with its felt trimmed to half its size has been used on the vertical surfaces. On the horizontal surfaces I have applied a dark base color, intervalled by a thin layer of Dullcote and on top a final hand with the decks' color. After several washes and waiting for it to be completely dry, I have traced the lines representing the plating with an Exacto blade using its sharpened side of the blade thru the top layer. The result at the end is a scribed line getting its color from the lower dark layer, very thin and realistic. One more advantage of this two-tonal process is that by using an ultra-fine grain sanding stick as a brush used for dry-brushing, it is possible to achieve a very realistic wearing effect. Dry-brushed pigments are layed over while using the process I have just mentioned, the top paint layer is shaved completely along detail's edges as it usually happens in reality. Same treatment was applied to the recognition stripes on the foc'sle, in this case using white as base color. The hard part is to scribe the lines delicately enough so not to cut thru the Dullcote layer in wich case the white of the resin would show up ruining the original intent. For the teak area a similar process has been used to draw the wood planks pattern and the slightly irregular shading so typical for this kind of surface. All the rest of the weathering process such as rust streaks or stained areas were hand painted with a very fine brush. Most of the parts have been gently dry-brushed with "Flint grey" enamel from Model Masters or Model Masters aluminium metalizer. |
| The diorama:
The water is, as usual in my case, a simple oil painting on a regular picture frame's glass. For me, visually, using a particular way of stroking with a wide flat brush is the fastest and more scale appropriate simulation for wavelets. The oil paint has brilliance, chromaticity and glossiness that is hard to match with acrylics. On the downside, it takes ages to dry, allowing though some time to correct and blend if in need to do so. As final layer I usually pour Future over the oil base and spread it carefully with a brush. Be aware that Future over oil colors that are nor completely dry can cause some problems. The dock is completely build from nothing else but Evergreen products and cardboard. PE cranes are from Loose Cannon while vehicles from MMN (white metal) chains are from Roco. Railings, stairs and ladders provided in the kit have been used for the dock. The flags are decals from Delphis that have been placed over small pieces of "Bare metal foil", probably the thinnest aluminium film available. At the end, just experimenting everytime and learning always something new. |
