by Jean-Bernard André
1/35 Koktebel (Scratchbuilt)
Maybe some of you saw that very funny-yet-moody totally great 2006 American movie called Bubbah Ho-Tep. At one point the old man had just died and the daughter is going through his stuff. She finds his Purple Heart, has a glance at it and promptly throws it in the wastebasket.
Now guys, what will happen to our beloved dioramas when we will all be resting in peace? I am living in such a world that I fear it could be totally alien to other people, that what I am doing and the possible beauty that I can find in my dioramas just could appeal to nobody else than me and the dozen of people that cheer me up every time I post some stuff in a forum. I have no illusion about what will happen to my dioramas when I pass out, and stupidly, I happen to care about that.
Now I remind my great-grandfather, a Parisian seller who fancied himself being an artist and indeed he was quite the gifted porcelain painter. He painted hundreds of them. So, for a few years now, every Christmas my mum tries to slip me one or 2 plates alongside more useful stuff in my yearly loot.
Why is his stuff passed from generation to another, while the Purple Heart ends up in the dustbin? Thats because great-grandpa painted birds, nature, women with red faces and big buttocks running through fields. Timeless stuff stuff that is pleasing to women.
So maybe I found a goal with my dioramas, if I were about to disarm them, maybe they will turn me into this centurys family bore? Maybe I would still be somewhat reminded in 2100?
At the time of starting this diorama, I had just finished a very big one of the A bridge too far kind. Even if it ended being quite satisfactory, the amount of time and energy I spent building it was certainly much more than I could afford. So I decided that the next one would be a walk in the park, something very simple, yet a bit new and daring. From the start, I wanted to do everything by myself in this one which included sculpting the figures - and to use all my abilities to create outstanding water.
One evening while checking at my reference books which consist more of painters monographs than the Osprey-type reference books - I dug out one of my favourites. Its about Ivan Aivazovski, a Russian painter that devoted his life to painting the sea and the boats on it. Admittedly, in my opinion, this particular XIXth century Russian painter is a bit of a hit and miss.
His best paintings (The Seventh Wave and The Black Sea) certainly reach Turners kneecap, but a lot of his work is just a bit too much affected for my own tastes. But then theres a big something about his work. This guy knows the sea. He paints them with colour and movement. Man, hes been there But then a lot of his colours are the powerful ones that you get at dawn or sunset and there is supposed to be no way that you can reproduce that in a diorama as you cant display any background unless you build a shadow box around.
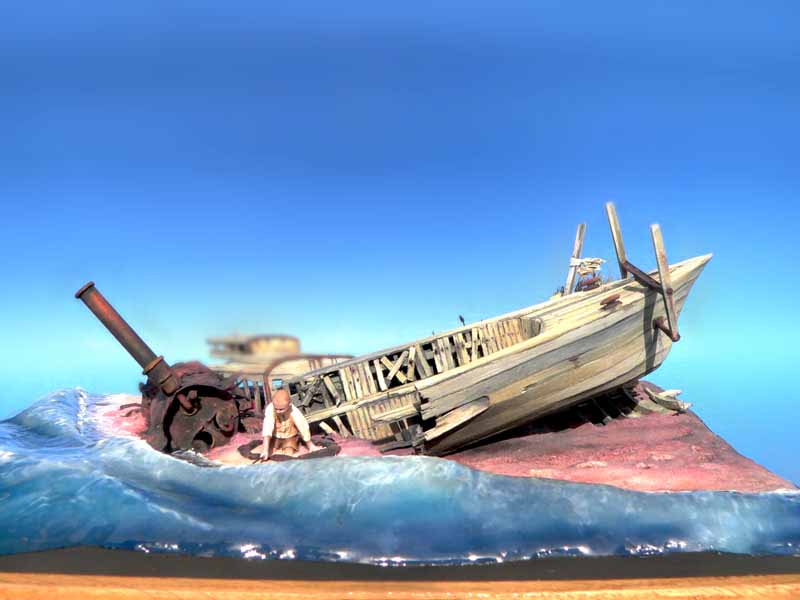
And its by thinking about this problem with the help of very good music that I decided that I would simply bypass it. I would make a sea shore probably complete with a boat - but still I would use the warm colours that you get on summers evenings (See Photo 1).
and then finding a suitable vehicle to go with it and not the opposite
Wanting to use a child that would be at the central focus of the scene, I needed a very special kind of boat, it had to be thin, like an arrow, so that my main character would not be crushed visually by a lumpy sloop.
Then I remembered the very first page on my book about Russian Torpedo boats, which shows a couple of very thin wooden boats with some kind of pole at the front. After some enquiries in a forum, a nice modeller sent me very tight looking plans taken from a Russian magazine showing this really fine XIXth century boat called the Folly which I immediately visualized as a very handsome wreck.
Doing the plans for the diorama afterwards was a walk in the park because everything had to be done scale wise according to the child that would be at the middle. So this would not be a big diorama because, however empty it could be, the eye would be invariably attracted with some other details otherwise. So, I set up for a 22cm x 16cm base - which would be perfect. I then used my desktop printer to get a few overhead views of the Folly, which I cut up with some scissors and proceeded to arrange the scene so that the whole could look okay (See Photo 2).
My initial idea was to do some kind of three tiered (foreground; middle-ground; and background) kind of diorama. In this case it would have been the sea, the child, and the boat and shore sand respectively. But then I had already done a diorama along similar lines some 10 years ago, and now recalled the reasons why I was not entirely happy with it.
Firstly, a diorama is not a painting. Its a 360° object which should be viewable from every angle without any effort. Thus the idea to put a background would be certainly very bad because it would have restricted the view of the spectator from one side (maybe even 3 if I wasnt careful), and it was something I wanted to avoid.
So I chose to arrange the various aspects, the sea, the bits of boats and the sand, so that those would revolve around the child, as if he were at the centre of a semi-chaotic scene.
Then, as I wanted to create a special lighting effect, I chose a colour setting. The waves would be a deep blue, with the crests of the waves being of a much lighter shade with maybe a little bit of red. As the sun would be setting, the bottom of the landscape would have rose-purple shades, while the higher ground would have a nice yellow-orange sand tint.
The boat would be clearer on the top than on the bottom, while the light would be coming from the sea. The childs shirt would have to be white so that this colour could stand up near darker shades, especially the blue of the sea (See Photo 3).
I remember as a child looking at some balsa boat models in the hobby shop and being enraptured by the many intricate details that had to be cut out of very thin balsa wood. But then my mum wisely said You will screw up this one in no time, and bought me a small model of the HMS Hood which I screwed up anyway, but not before torturing the bits of plastic for many hours.
Since then I have always thought that I had some revenge to take out on balsa wood, and this diorama proved to be just the occasion. Indeed, as the boat had to be cut in half, I had no choice but to build an empty hull.
Originally I had thought of doing a full hull out of wood and mastic, and then vacu-forming the plastic hull with a homemade machine. Unfortunately I am rubbish at doing any other machines than the miniature ones that actually are on my dioramas.
So I had to find another way (See Photo 4). I started by printing the top and side views of my plans, and then proceeded to number the various cross sections I required (step 4/1). Next I printed all the sections of the boat as they were present on the plan, numbered them, and cut them out.
I then took 2 medium sized glass sheets, and placed my bits of papers on one of them. Next I made a MagicSculpt lump and flattened it against each of the cross sections using the curve as a direction (step 4/2). I then greased the second glass sheet with olive oil from the kitchen I pray that my wife never reads this - and pressed the glass sheet against the MagicSculpt so that all the lumps would be taken in sandwich and flattened without them to adhere on the glass.
The great thing about MagicSculpt is that you are doing a different use of it depending of the degree of dryness. I waited between 60 to 90 minutes for the MagicSculptt to still be workable and bendable, but not deformable with fingers anymore.
I turned the paper and MagicSculpt cross-sections and using the transparency of the paper, I drew back all the curved shapes with a pen (step 4/3). Once done, I proceeded to cut all the cross-sections with an X-Acto knife and then used an indelible pen to number them (step 4/4).
I then cut a keel out of strong plastic, made some notches on the cross sections and fixed them in their final position (step 5/5). I then glued a balsa wood ridge (after failing to succeed one out of MagicSculpt using the same technique as before), and here it was, I had an okay looking boat skeleton in no time of course it was not perfect as you can see on the photos, but it is enough if you consider most of it would end up being hidden (step 5/6 & 6/7).
Finally I cut some thin balsa wood stripes and proceeded to do the planking. As this kind of wood is soft enough, I had no difficulty doing the fine bending. I glued the whole with superglue and proceeded to very carefully sand the edges that would tend to appear here and there.
The next step was the boilers. That one was a fine internet story where I posted a good half a dozen questions on at least 3 forums so that somebody explains me why I had 2 different entries of coal on my plans as well as other issues. I was helped handsomely, and proceeded to build the boiler out of rolled plasticard, plastic tubing for the bars inside the boiler, and a bit of brass tube for the chimney (step 7/8).
The back of the boat was done the old way - first cutting out the fine windows with a X-Acto knife before cutting out all the different parts (step 8/9). To do the bending of the roof, I softened the balsa part with the back of the knife by crushing the wood according to the supposed places where the planks would have been (step 8/10 & 8/11).
The details of the boat were first done by making an interior out of balsa (step 9/12) then gluing it in place (step 9/13). I proceeded to glue some small planks falling from the inside of the boat near the place where it broke. I added some of my last Grant Line plastic nails to add a bit of detail near those half falling planks (step 9/14).
While I was working, I came to meet a mechanical genius thanks to the forums, who explained me in 5 minutes what I had been struggling to understand for a good month. Most particularly I learned about asbestos being fashioned in a rope, and then fixed on the boilers with some kind of plaster the whole being tighten on the boats hull with some very light bricks.
So I encircled the boiler with some model ship rigging rope and coated it with plaster (step 10/16). When the plaster was set, I ripped it out with a cutter so that it could look a bit scruffy (step 10/17), I then glued back some of the plaster scraps to create a broken appearance. Finally I added some photo-etch screws from an old Royal Models set as well as a front device which was adapted from a truck models engine which was lying in my never to be finished box. I ended up by putting some plating above the asbestos (step 10/15). The bricks were simply done by gluing some evergreen strips to some plastic base, and then pouring some plaster in them, waiting for it to set before cutting out some bricks (step 110/8).
According to my plans, I fixed a metal rigging to the back part of the boat (step 11/19), and sculpted the big device at the front of the boat, the purpose of which was to store the pole mines, out of thick balsa wood, as well as one or 2 details in MagicSculpt (step 11/20).
The painting was quite a straightforward affair. Last summer I was tramping in the marches near Arcachon Bay in western France when I discovered some very well hidden fishing boats wrecks. I took a couple of photos and noticed the very light colours of the wood being attacked by the salt and the sun. I then put at each side of my palette some white, sand, green and brown acrylic paints and proceeded to paint the boat plank by plank, every time using a different mix so that the boat could appear like it would collapse at any minute. I added some darker shades under the boat as well as below the side planking as well as some rusty run offs on the wood. I finished the wood itself with a slight white drybrush.
The rust was painted in my usual fashion though this time I tried to make it more red than usual. I poured some red, Van Dyk Brown, Burnt Sienna and Black Windsor and Newton pigments each side of my palette, and some watered down brown paint in the centre of the palette. Picking in each of the little pigment heaps and mixing it with the paint, I half painted, half poured the mix on the metal; after a good half an hour it looks like what you have on the picture (step 12/21).
As a New Year resolution for 2007, I had stated that I wanted to sculpt some kids.
What a stupid statement! Sculpting that child has got to be the hardest thing I ever did. And it seems it is the same for just about everyone. The need for sculpting a child came from the fact that I just could not find any children, even in the best aftermarket companies, which would suit my needs. They either look like caricatures, or like young rascals. And I didnt want my child to be either of that.
Years ago I had bought Hornets Little Drummer Boy, which is certainly the worse (and only from what I saw) sculpting in Mr Saunders complete career. He just looks beefy and moronic. But then that special figure proved very useful to get an idea of the right proportions to use, and the level of details I could obtain if I was really ready to pay a lot of attention in the sculpting process.
I started modestly with the body, using some roughly shaped MagicSculpt, as well as some paper clips cut at the right size for the arms and legs (See Photo 13). I then coated the shape with some more MagicSculpt to have roughly the right weight of the child.
The wrists and ankles are thinned at this stage which will be easier afterwards to fix some legs and hands (See Photo 13).
I started adding details from the bottom on. First I modelled some kneecaps and then the shorts. I carved the various folds around the middle of the shorts while the MagicSculpt was hardening, and ended up these with a bit of carving with a modelling knife once the mastic completely set. I also sanded both legs and shorts at this time (See Photo 13).
I sculpted the boots in 2 steps. First I did the soles of the shoes while cutting out some partially hardened MagicSculpt which allowed me to still be able to bend it around the talon once glued. Then I put 2 strips of MagicSculpt above to create the upper part of the shoes. I blended up the front and the back of the shoes and let gap the opening hes a child so he is not suppose to have the laces put on. I purposely gave him some shoes that are way too big for him in case anyone wonders.
Then the hard part started which means the hands and the face. The hands were done twice. The first time I used my magnifying glass to disjoin all fingers from a MagicSculpt strip while this one was still unset. When set I carefully sanded each extremity so that it really could look like fingers. Unfortunately I managed to break most fingers during the following weeks while working on other parts of the diorama!
So I have been fixing some new fingers this time using some very fine Green Stuff strips all glued or tied to the main hand. The Green Stuff is a mess to work with in my opinion, but then it is also way more flexible once set than MagicSculpt which means it can sustain rougher handling - which suits my pretty violent behaviours towards my own dioramas quite well. Some people might say that Green Stuff also adheres much better to other surfaces than MagicSculpt which is true, but then you have to handle the stuff a lot while you shape parts as tiny as the fingers, and then too much handling just kills the stickiness which is a bad thing when you want to start fixing them (See Photo 14). More green Stuff was used to model a collar over a sculpted shirt.
The head was another story, and it took me 3 different attempts to finally come up with something really worth my own expectations (See Photo 15).
First I was to realize that you need readily at hand some really good reference. So I choose one readily available child, which was the one on some DVD cover. Browsing through the movie, I managed to get enough screenshots so that I could cover most angles of the childs head. Then I modelled roughly a head shaped ball of MagicSculpt while leaving enough stuff below the head itself so that I could actually handle it and put in on a table without actually touching the sculpted part. Once this ball has set, I roughly carved the neck and the jaws on the ball. And proceeded to add cautiously with a modelling knife some very tiny MagicSculpt bits at the right places forehead, eyebrows bones, cheeks and lips. The nose proved particularly difficult to come with as I realized I did not have any sculpting tool that could be tiny enough to model the delicate nose cheeks as well as keeping the cheeks themselves in a good shape same thing for the lips. I let the whole dry overnight and added details for the eyes and ears the following day.
So now what lessons did I learn from this experience? Firstly, no sculpting knife available from hobby stores is thin enough to sculpt the tiny details that are the ones of a childs features (See Photo 16). When next I decide to sculpt a child I will first build up an array of very fine sculpting tools I am considering using some sculpted and superglue covered toothpicks, as well as some flexible metal tools that I can cut and sand from a beer can!
The child was painted with oils over acrylics. As usual I feel the pain of painting my own compositions, as every defect, as small as it might appear, proves to be a nightmare to deal with.
If there is a domain in the diorama world that can really set some aside from the rest of the diorama lot, it is the way one handles the ground cover.
For years I have been bypassing that step by simply not showing any groundwork at all. I model seas, beaches and so forth, but ground cover always has always been kept in a more rudimentary form.
The main reason is that I believe in displaying it accurately, I simply cannot understand people that will make a difference between Ausf Cs and Ausf Ds, yet model generic trees in their dioramas. Most people cannot name vehicles in dioramas, but they are able to tell the difference between a cypress and a pine tree, between an oak and an apple tree. So here I started my long quest for accurate ground cover by modelling simple beach ferns.
When I was a child I spent most of my holidays on the Atlantic sea shore, places bleached by the sun, with very clear sand and also itchy and sometimes tall ground cover which has got an advantage as it is relatively easy to make.
Looking at some photos of the real Koktebel Bay, it seems this ground cover is present there too. As it is supposed to be only in one corner of the diorama, it was not too important that I displayed only one particular kind which is another way to bypass this particular step.
In many dioramas that feature tall grasses, it generally looks like somebody has simply cut some hair from a broom and glued it to the base. While this is basically what you must do, there are a few issues worth consideration (See Photo 17).
Issue 1: there is often not enough space between each leave and when looking at the diorama it appears as if somebody just glued a broom to the base Issue 2: usually the leaves are all of the same size Issue 3: the broom hairs tip is square because it has been cut that way. Issue 4: the way it is glued to the floor is often too even and also does not follow some of Mother Natures basic rules. Issue 5: and it still looks like someone glued a broom to a base!
The first thing I do when planning to display groundwork is find some reference photos and print them so I have the references near me when I model.
Now, with regards to the task at hand: tall grasses. I use a slightly more expensive broom; I use a broom made of silk. This way I am generally ensured that the tip of each hair will be pointy. Two other advantages of this kind of broom are that firstly they come in different shades, ranging from black to white which is a fantastic base colour for painting, and secondly that the lengths the individual hairs vary.
I start by pressing a bunch of hair between 2 fingers and then cut below the fingers with a pair of scissors hairdresser style. I try to cut at least a length which will be 2 times bigger than what I will eventually be using (See Photo 18). In my next step I roll a medium-thin sausage of MagicSculpt and apply the hair using all the length of the lump and try to make the size of each hair vary. Then I cover this first MagicSculpt sausage with another one and flatten the whole. I then roll the MS+hair which produce some lump with hair coming out of it at random and not just from some hole at the middle of the bundle.
This particular kind of beach fern also has a main branch to it, with a bit of tuft at the end. Making this is pretty straightforward. Simply stretch a plastic sprue over a flame, dip one end in some acrylic modelling gel (the kind you would use to do sea foam), stick the branch in the hairy lump, and let it dry. Once dry, cut away the excess hair on the bottom (See Photo 19).
Once I had a good dozen of those ones, I cut a big hole in the canvas so that the huge lumps that hold the hair could fit and then glued all the lumps together, trying to join them with a bit of my sandy special mix in the process (See Photo 20).
Of course, as was I modelling a shore that is supposed to be battered by sea and wind, I mostly put the ground cover in the most sheltered area of the diorama which means behind the boulder. The ferns that appear on the boulder are also smaller. The same thing to the disposition of each fern the biggest are in the most sheltered areas etc.
I really wanted all the elements present on the ground boat bits and groundcover - would appear to just emerge from the sand. The sand had to look like real beach sand, a flowing matter that leaks on the ground, that penetrates and engulfs every element (especially the windows of the back part of the boat) until the sea stops it.
As such a matter would have been lacking in details, I would need some extra stuff that would balance this flow. The zone near the sea would need to be flatter and covered with some footprints from the child, and maybe contain a few shells or small rocks that would have been washed up by the sea. Next I needed a hillock. This was both for my own tastes as well for bringing a balance to the diorama. Perhaps something more rock-ish, like compacted sand or maybe even an eroded boulder - both would work.
I first bought some feather cardboard. I proceeded to cut it to the right dimensions, and then cut bits of it to roughly make the surface. I then dry-fitted the different elements of the boat according to the plans before cutting the right emplacements into the cardboard (See Photo 21).
Once this was in place, I started doing the solid stuff. I roughly mixed some black paint in some Plaster of Paris and let it dry. I let it dry for a day before breaking it into lots of little pieces with a hammer. Next I mixed some plaster with a rosy kind of paint and, using my fingers, applied it very roughly to the hillock. The reasoning behind tinting the plaster is that I could not afford to have any white spots on the hillock. If I painted this I could have missed a small area.
When the plaster started to set I switched from using my fingers to my modelling knife, and kept working its shape. I can now reveal one of my greatest theories regarding creating natural shapes. When your fingers stop obeying your mind or when you simply forget what you are doing, in other words, when you dont think about the shapes you are creating then, you really begin to create some interesting and natural shapes. Dont think too much, you will get the stuff wrong, it will look calculated and nature is not calculated.
I next make a mix of heavy acrylic gel and a darker shade of rosy acrylic paint and sand. Most of this is applied around the shore and the plaster stones are pressed in it. The rest is reserved to later bind the vegetation and the ground. I then proceeded to apply different rosyyellow shades here and there on the hillock to add variety. Mind you, not too much as most of the final aspect would be given by using some paint pigments (See Photo 22).
The pigments I use are regular Windsor and Newton pigments which I bought more than 10 years ago - nothing exotic or modeller-proof. I have the basic tints and a couple more specialized ones when it comes to the brown shades. I mix them together as I work so I never really mix the same colour. The base I used there was black. I added some Van Dyk Brown, red and yellow, and also some beige/rose tint I found once in an art shop.
I first applied the dark mixes for the dark shadows. As the hillock as got some big crevasses, I really needed the bottom of these to be very dark. I next applied some lighter mixes to the upper parts (See Photo 23).
Next up would be the best part of the groundwork, which means the flowing sand.
My last diorama included some snow work. I used Microballoons, and instantly loved the stuff. I got some dramatic results when I mixed them with paint for shadows on the snow. However, those results were dramatic in the context of representing snow.
With this diorama I mixed the Microballoons with paints to create sand, and it worked fantastically! Firstly, I could use 4 different coloured mixes at one time and make it blend one in another while the stuff was not set. Secondly, the setting time of the stuff roughly 1 hour - makes it an ideal component to use. Thirdly, it produces a slightly grainy texture which is absolutely ideal to represent sand in scale. Finally, as the stuff is semi-liquid, you can pour it anywhere you want and it will gently flow according to gravity. This last point was especially useful when pouring it through the different openings of the wreck (See Photo 24).
So, basically, that is exactly what I did. I poured some Microballons (the Signifier brand which is not as shiny as the Andrea one is the real deal here), acrylic binder and paint into my trusty Sake glasses. I used some lighter yellow shades near the bottom of the wreck and darker rose tones near the front of the boat, but especially between the wreck and the hillock according to the general sense of the light (See Photo 25).
When I was modelling snow I started to add stuff on Microballoons, which caused me a fair amount of trouble. With that in mind, for this diorama I chose to create shadows using pigments, which worked really well. I applied Van Dyk Brown and black under the back of the boat amongst other places.
Attempts at creating some highlights using the same technique went awfully wrong though. The pigments tend to go into all the holes, between each Microballoon, which really does not look realistic. Further attempts at doing some light dry brushing proved to be completely lousy too.
Lets face it, guys; you simply cannot do much with Microballoons once it is set! Other than that, what fantastic stuff! I even had working time enough to press a shoe-shaped bit of MagicSculpt I had previously sculpted in the mix to imply footprints - so that the child did not appear to have simply emerged from the blue (See Photo 26).
or how to spend 4 months on a project while I could have get away with it in 2 or how being a stingy diorama builder sometimes costs you time and money - part 1)
For quite a long time I have had the idea of creating sea in the following way: first create a master; mould it; pour some polyester resin into the mould; and finishing by adding waves using my usual tinted acrylic gels.
The first step was no problem. I spent a lot of time on internet searching Googles image search engine for wave, seashore and similar until I had a good idea of what I wanted to do. When I did, I sat at my table and proceeded to roughly carve some feather cardboard like the sea I wanted to create. Then as the feather cardboard is rather soft, I covered it with plaster. I applied some MagicSculpt to create some extra details like the tip of the waves (See Photo 27).
I had some latex left from my iceberg making experience, so I proceeded to use the same moulding technique. Unfortunately it went awfully wrong as the surface that needed to be moulded was too large and I could not get any rigidity whatever technique I used. I even tried to set a 2 part plaster mould to get some rigidity to the base, but it just failed miserably (See Photo 28).
Then I tried simply with plaster and it went even worse. Even though the mould appeared to be okay at first, when I poured the resin in it I simply could not detach it - despite having greased the mould liberally. I later destroyed it after attacking it with a hammer (See Photo 29).
Then, with a rather clear vision of the death of my wallet, I proceeded to cross half of the town to buy some silicon rubber. I built some walls around my master using some leftover bits of feather cardboard and poured the silicon. It went like heaven and in no time I had a perfect mould - and a phone call from the bank.
Using polyester resin is all a question of attention, nerves and timing. I both love and dread doing water this way because in no time you can ruin 3 months of efforts and it kind of looks like my life (See Photo 30).
I carefully poured three different coloured layers of resin and no more (See Photo 31). The first layer was done with transparent white, with slight touches of transparent red and phtaloh blue red (another expensive one) oil paints. I poured my mix of paint and resin into the mould, which of course went to rest on the crest of the waves (read: the bottom of the mould). I then waited for the resin to set.
As everybody who has worked with resin knows, after some time when nothing goes on, the resin sets very fast. During this very short time you have to stretch the mix on the upper parts of the waves. This is a crucial step so that it does not appear that the resin as been layered, but rather that some bubbles and foam has been forming below the waves.
There is no need to wait for the first coat to set completely. Pour another coat, this time in 2 different layers, this time tainted with the same transparent dark blue but mixed with transparent white near the clearer places according to the direction of the light you have been setting up earlier. The last coat of resin will be the same kind of dark blue, but more opaque so that the wooden base below the waves cannot be seen.
I let this dry for 2 days so that the resin was not sticky before unfolding the sea. It was already looking real fine - even without the foam (See Photo 32).
I use a white tinted acrylic gel to create sea foam. These gels come in tubes and are available from art shops. I use one called Transparent heavy gel. The stuff is opaque when you unscrew the tube which leaves you mostly blind when it comes to the right amount of white acrylic paint you have to pour so that you can eventually shape some realistic foam.
First you have to remember that these kinds of gels reduce a lot while drying, which means that you have to use very little paint. I would say the ratio of paint to gel is no more than 5%. Secondly, bear in mind that you really should not use too thick coats of gels, because the stuff might dry on the outside but not on the inside, which would lead the inner parts of your coat to stay opaque/white.
There is a trick to knowing how much paint you should use. You will notice that when you stir your mix that if you use too much white paint it feels like it is a jellified paint or something. When you have this kind of heavy paint, you have to mix in more gel. In fact, the mix must appear more opaque, than white. When you stir the mix, its heavy texture must stay more or less the same. When the texture begins to flow a bit too much, just stop adding paint.
One last thing: you will be using several coats if you want your foam to look okay. This means that you have to mix a bit of blue into your white to do the foam. Only the very high highlights, the crest of the waves will have to appear white. Remember when you are doing a diorama that it is not a matter of shadows and highlights, but of a matter of an infinite number of shadows and highlights, ranging from almost pure black to almost pure white.
Once I have prepared the gel and paint mixture, I have several ways of creating the foam (See Photo 33). My preferred method is to simply dip a finger into the mix and touch the surface. When you lift your finger, it will look just like a spider web on the water. Then use a brush wet it with water first - and blend all the sides until it looks really good. And then do it again and again.
Next I use a stronger mix (with more white paint I mean) to do the crest of the waves. Typically when I build those crests, I prefer painting them with a not too loaded brush. And just like the ground cover, put a very loud music in your headphones and just let your guts speak for yourself, and do not think too much about the places where you apply them.
What I actually do is look at a lot of pictures of foam and sea on Googles image search engine, and then try to forget about the reference and recreate the stuff from memory. It certainly works better than having a single picture near you because you loose some time at checking your references. And time is a luxury you do not have while doing this kind of stuff.
Typically, as I am never happy the first time around with the foam, I coat another lightly blue tinted transparent resin with a brush so that I can slightly conceal the first coat of foam. I then make another coat of foam, which means 2 layers of transparency without even counting the first more or less white stretched resin coat I have been applying prior to the foam.
When all is set, I apply a coat of Humbrol Clear Cote to seal the stuff. And then, one last pure white tinted mix of heavy gel, which I apply only to the crest of the waves. Why do I apply this last coat of gel after the Clear Cote? Hey, thats because sea foam is not glossy, but the water is. In other words, the foam that is under water is glossy, and the real splash of the wave is not. And indeed the transparent glossy gel plastic texture is ideal to do the tip of the waves.
This method might appear somewhat complex, but it really is not. You just do the stuff over and over on the top of each coat until you are happy with the result. Typically, the more coats there are, the better looking the sea is. The other key point is that you have to work pretty fast because of setting times. However, it is not really that much time consuming compared to other things.
Gluing the sea to the sand caused another nightmare. Something I did not foresee was that I would need a bit of extra place so that I could do a realistic beach with waves crashing gently. So I had to add a bit more of resin at each side so that the sea could fit with the ground cover (See Photo 34).
In order for this joint to be perfect, I cut the base at the place where the sand ends and glued the base and sand and the sea temporarily on a sheet of cardboard. I then poured my sand mix near the waves. When those were set, I poured a blue tinted resin mix near the shore and one some extra waves. When the joint was perfect and totally set, I wiped out the cardboard sheet and the diorama could have been finished (See Photo 35). Throwing Bill Horans book out of the window and creating bases
or how being a stingy diorama builder sometimes costs you time and money - part 2
There are a lot of things that make me smile in the small world of model making, but the bases some painters use to display their figures always makes my top 3.
Some do not seem to realize that by making some odd choices they distract the attention from their sculpted or painted work. Others will just screw up the colour composition of the whole thing while displaying a dull tainted soldier on some very brightly coloured wooden base. And some simply seem to not be able to cope with the fact that they are doing miniatures, so they choose some grossly oversized bases.
Generally speaking, it is sometimes sad to feel behind the handsomely painted figure, the very basic lack of taste of the painter. I even threw up Bill Horans book out of the window the day I read his comments about the pricey rose wood he uses for bases.
But then, all this made me completely overlook the real problem. Which went as follows:
A friend sent me some pictures which he took at SCAHMS 2007. Amongst those was the piece that won Best of Show. The piece featured 54mm figure posing in his planes cockpit. The kind of stuff that moves me one without touching the other.
But said that friend you should have seen this huge great one piece shiny black base. I laughed. But then he insisted quite a couple of times about that particular issue before dropping anyway, the diorama is the base. And here some bell finally rang in my thick skull.
I turned 90° from my chair to look at my shelves and the bases I built for my dioramas. For years I have been using the same golden tinted wood to do them the kind of stuff you find at 3 in every Do It Yourself kind of supermarket - and felt strangely inadequate. Would my obsession of not spending money while doing my dioramas be my downfall? The same thing applied to the borders of my dioramas, which I tend to throw together in 5 minutes because I am in a hurry to start the next project.
So I decided to hit hard with Koktebel. The diorama was finished and I had tested the outcome on several English and Spanish language forums. Then I got really depressed.
And so, one evening I went to the garden shed where I had stored the diorama, fixed some sandpaper to a wooden plank, and proceeded to eviscerate the horrible balsa frame and thin the dioramas border down by a few millimetres so that there would be some sharp edges and limits. I then realized that the diorama was standing too high on its base. I wanted to do something quite flat so that the thin lines of the boat and the smallness of the child would be valued and here I had obviously half an inch of thickness that was not necessary to the final outcome. So I proceeded to carefully remove that amount of thickness from the base using a modelling knife. This was generally easy as the foam I use as a base was soft. But then I had to take a lot of care of not breaking the thin limits between the sea and the sand.
The following weekend I proceeded to cut new borders out of plasticard, I then put on some Tamiya mastic and sanded them so that no joint could be seen, and applied one last coat of resin with a brush so that there would be no transition between the sea and the plastic borders. I also applied some last coat of my tainted sandy mix here and there so that the joint could be perfect. After this I eventually went to a nearby carpenter and asked him to do an oak base for the diorama. I then glued the diorama on it and it was finally finished 4 months after I started it.
or Remember: have fun!
Often when I read modelling SBSs, the writer often make it sound easy. I dont think so. If you want to create good stuff, the main ingredient is complete dedication. You must believe in what you do.
I do not joke with my dioramas and I do not take them lightly either. Its so much more for me than just having fun like I read in forums. Indeed, by choosing themes that beyond the appearance of things are very close to my heart, and also by letting the ideas evolve by encapsulating my everyday feelings in my work, I ensure the fact that I will stay in focus for the whole build, that the idea I have in my head at month X will be actually done out of different ingredients some months later.
Now, I happen to really like this diorama. First, except for a few Royal models bolts its been done entirely from scratch by myself - with no help from any manufacturer. It is also conforms to rule n°7 of my 10 requirements for good dioramas. I mean that it is a real 360° diorama, that you can turn around it, photograph it under every angle, it will work.
I must say however that I am pretty annoyed due to the amount of money I spent building it. The attend result coming in at about 100, which is more than I spent on dioramas the previous year.
Naturally Koktebel is not perfect. My lack of nerves shines through a couple of issues: the child has obviously not being sanded enough; and it took me ages to come with a half decent base. That said, I am sorry to say I dont really mind too much, as I always think of my dioramas as being works in progress which will probably get updates every two years until I am totally satisfied with them.
No matter how hard you look, there is no sign of a single offensive weapon in this diorama. So maybe when my son is cleaning my stuff in 50 years time, will have a look at Koktebel, will not find it gloomy and will not throw it in the dustbin even if I am not there to see him do it.
While I do not tolerate anything that has been built by others in my dioramas, I certainly need technical and historical inputs, as well as good quality plans because I am totally devoid of any of the aforementioned qualities and stuff. Once again the internet has saved me on that one. And so I wish to thank PetrOs whose plans and translations from the Russian language were a bowl of fresh air in a sea of doubts, MSWs Wolves, staff and Piers for encouragement and even quotes (thanks Ion), my HF friends, but also Modelwarships, Solodioramas and Steelnavy forum members for their very great support. A special thanks to Charles Reading and Pete mechanical genius Vill.
